
本文最后更新于 825 天前,其中的信息可能已经有所发展或是发生改变。
casdoor
Casdoor 是一个基于 OAuth 2.0、OIDC、SAML 和 CAS 的,UI 优先的身份和访问管理(IAM)/单点登录 (SSO) 平台。

1.使用docker部署casdoor
①创建配置文件app.conf:
appname = casdoor
httpport = 8080
runmode = dev #run casdoor in development mode
SessionOn = true
copyrequestbody = true
driverName = mysql
dataSourceName = your_username:your_sql_pwd@tcp(your_host:3306)/your_dbName
# dbName = casdoor
tableNamePrefix =
showSql = false
redisEndpoint =
defaultStorageProvider =
isCloudIntranet = false
authState = "casdoor"
socks5Proxy = (optional)# if you need google log in
verificationCodeTimeout = 10
initScore = 2000
logPostOnly = false
origin = your_host
staticBaseUrl = "https://cdn.casbin.org"
enableGzip = true
②配置docker启动参数
docker run -p 8000:8000 -v /folder/of/app.conf:/conf casbin/casdoor:latest再之后,修改casdoor配置只需要修改app.conf,然后重启容器即可。
在浏览器中访问 http://localhost:8000。使用默认的全局管理员帐户登录 Casdoor 仪表板:built-in/admin
账号密码:
admin
123
要继续集成casdoor,您需要具备以下条件:
- 正在运行 Casdoor 服务。如果您还没有安装 Casdoor 服务,请参考服务器安装或尝试使用 Docker。
- Nginx 开源版本,在编译时启用模块。如果你不知道如何启用该模块,请参考 Nginx 模块文档。
- 要开启认证的网站已成功部署在 Nginx 上,并配置了域名(而不是使用 IP 地址),并且可以正常访问。
ngx_http_auth_request_modulengx_http_auth_request_module - OAuth2-Proxy 工具(目前 GitHub 上提供了以下两个热门高星项目,需要选择其中之一):
2.casdoor配置:
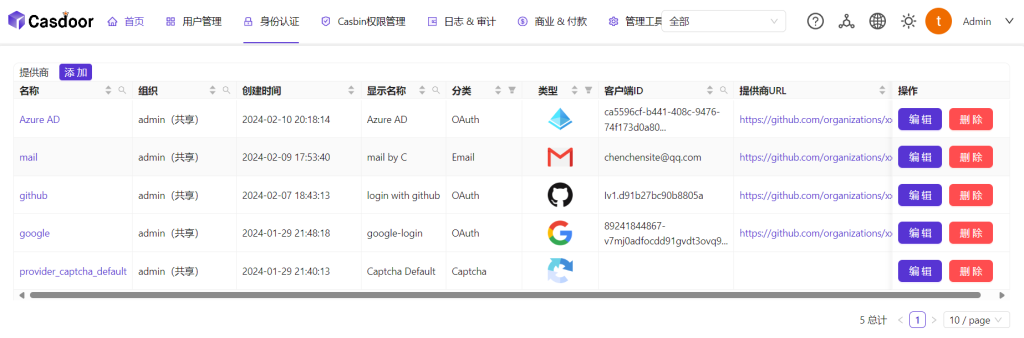
- 登录到您的 Casdoor 管理员帐户。
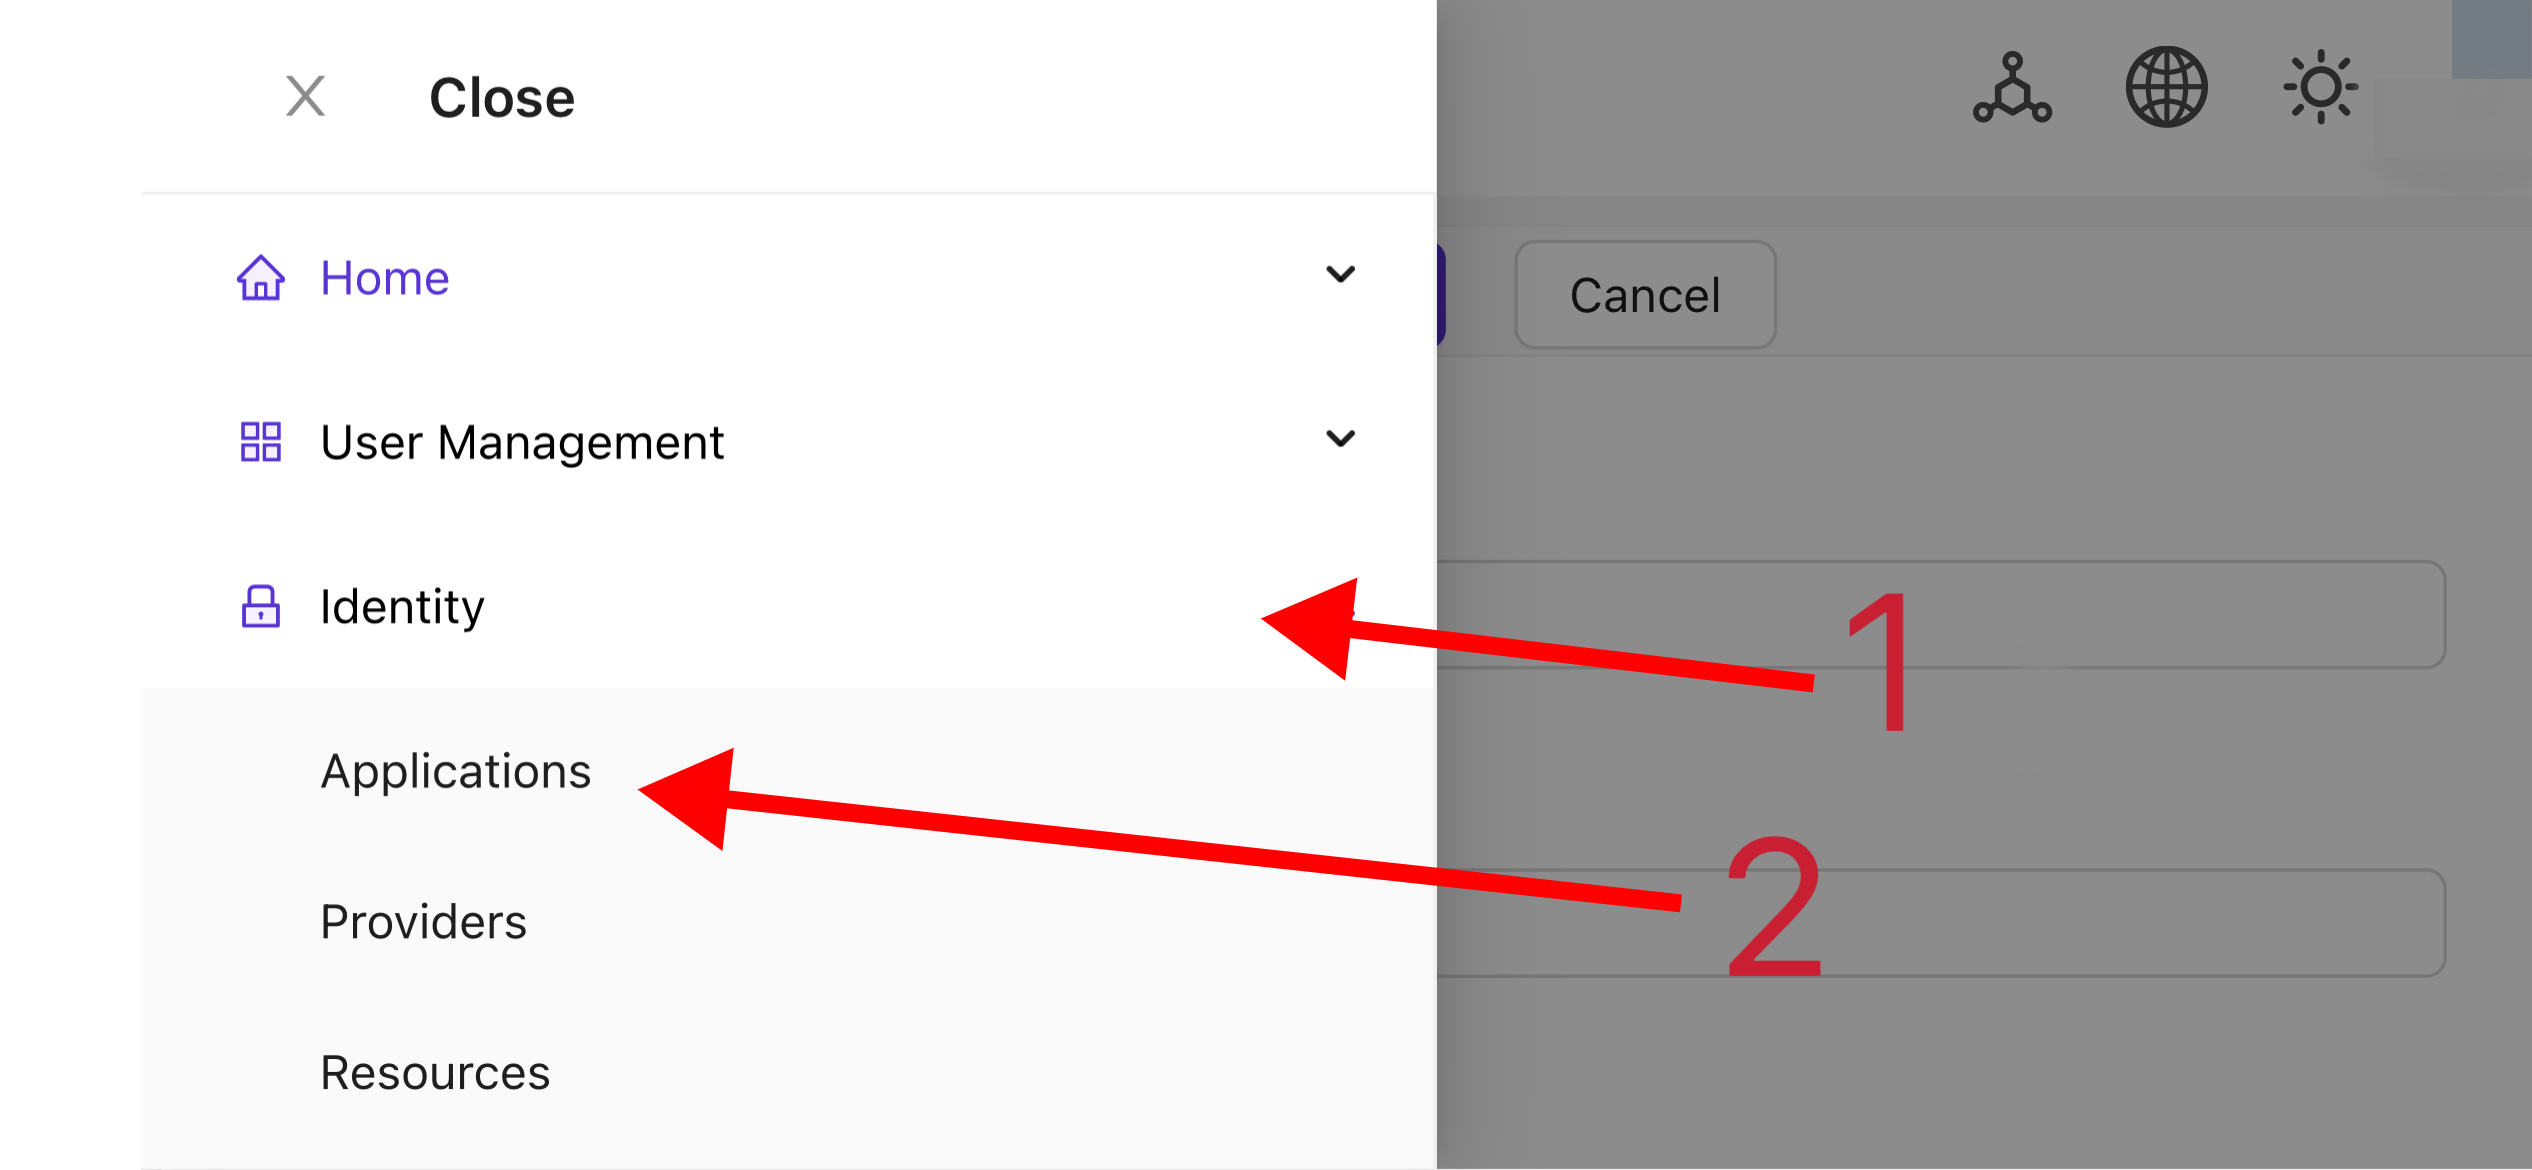
- 在顶部栏中,选择“身份验证”>“应用程序”,然后单击“应用程序”页面上的“添加”。

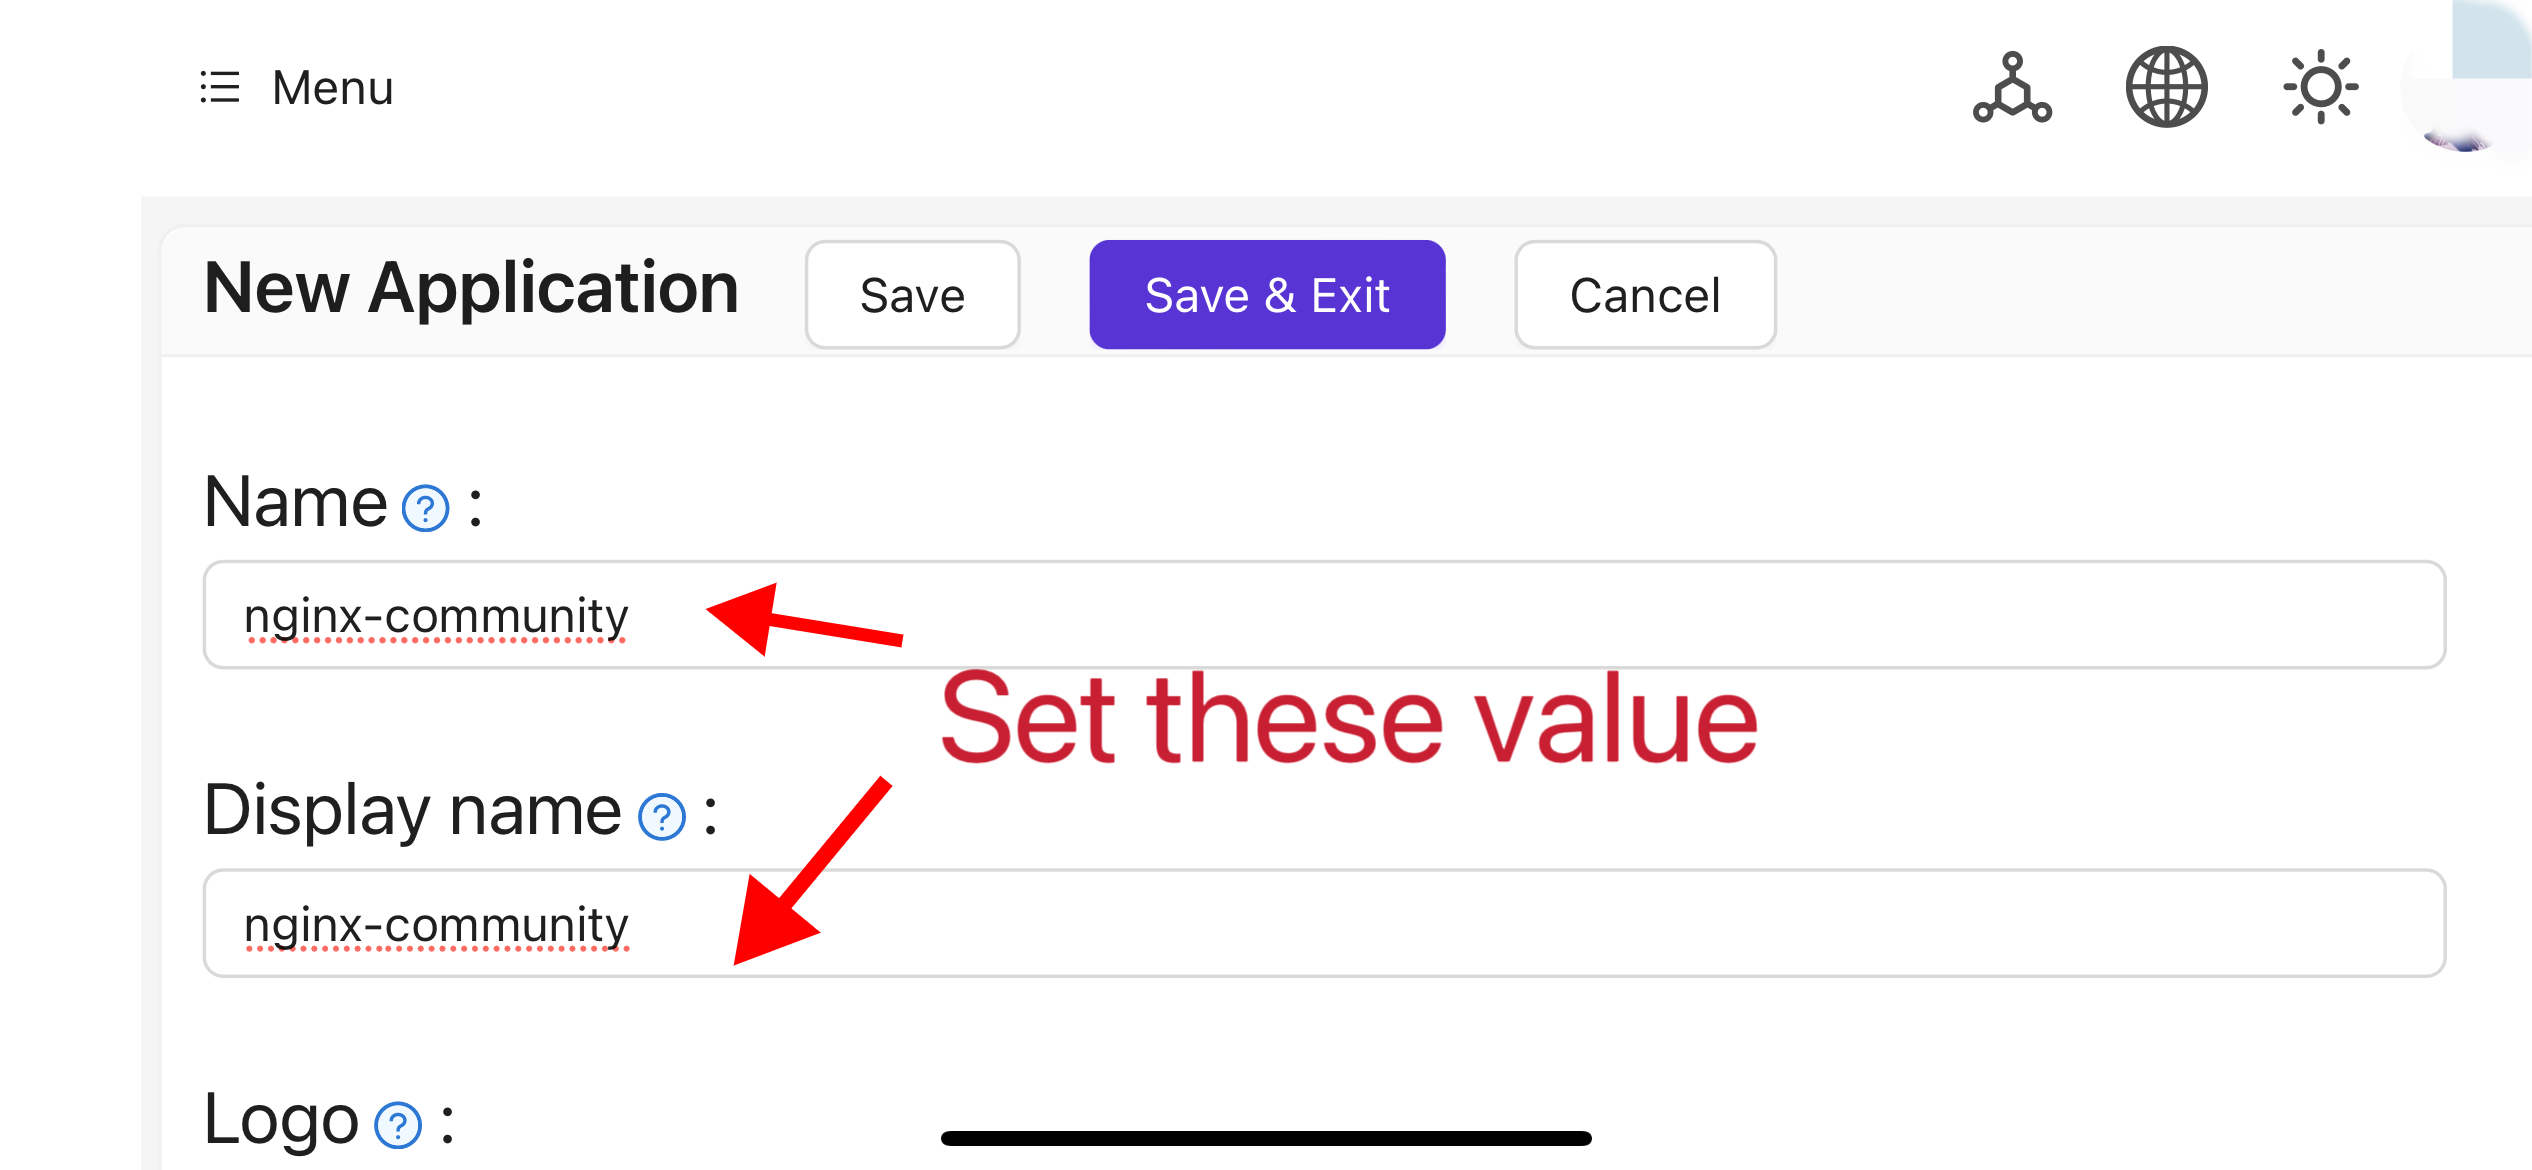
- 根据您的项目信息完成应用程序配置。在本文中,我们使用“Nginx-Community”作为示例应用程序名称。
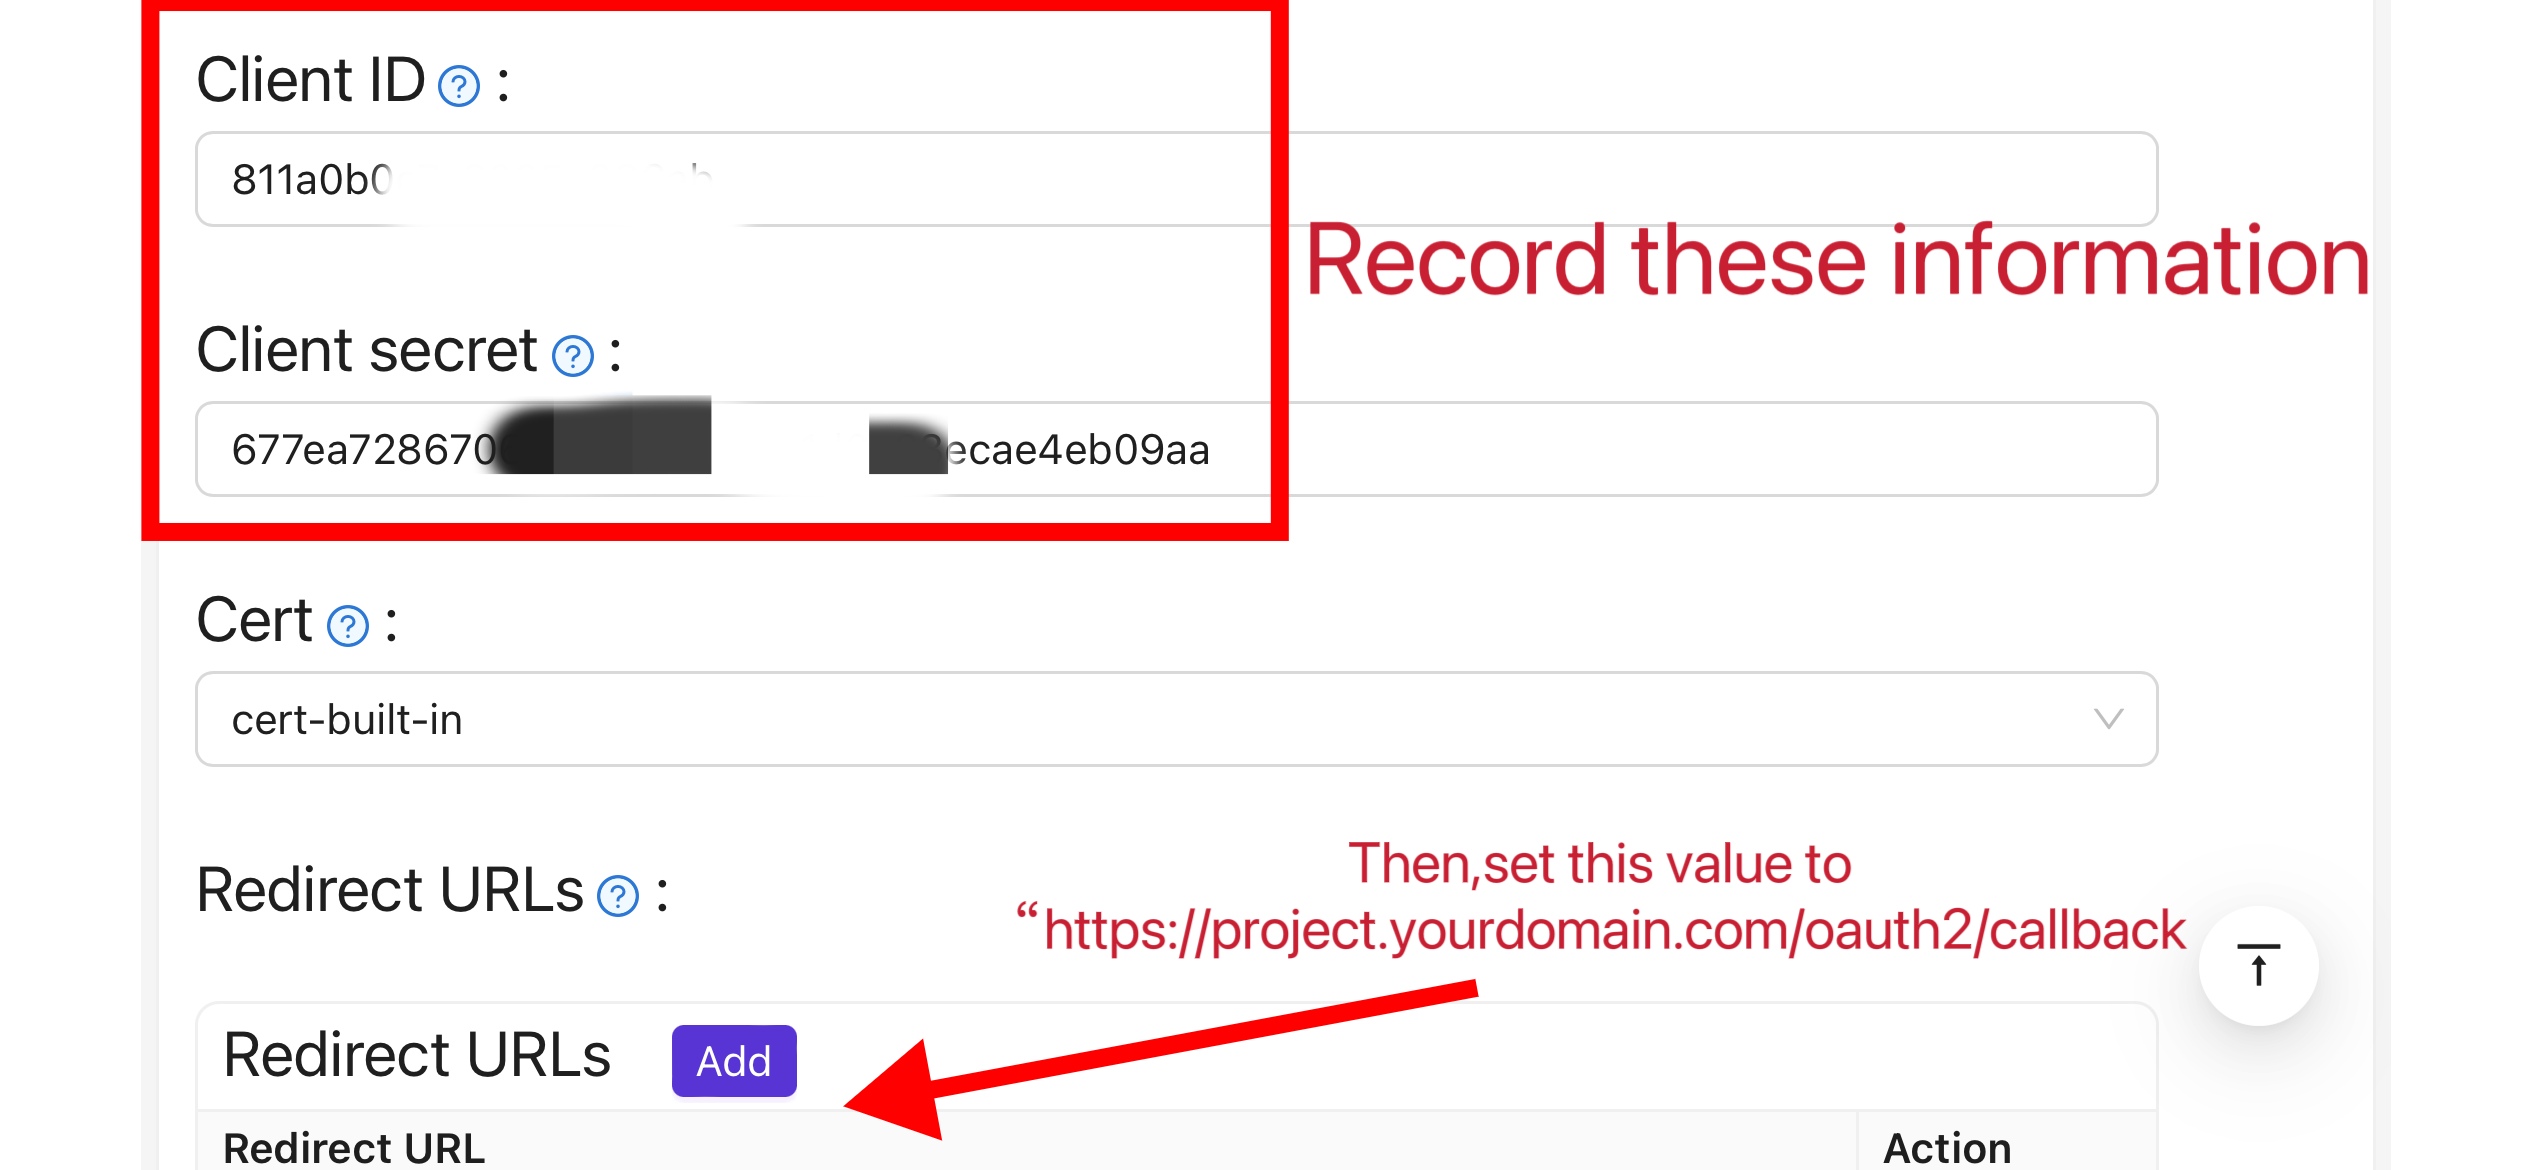
- 记下“客户端 ID”和“客户端密码”字段的值。稍后在配置 OAuth2-Proxy 时将使用它们。然后将“重定向 URL”配置为 .
https://project.yourdomain.com/oauth2/callback/ - 在顶部栏中,选择“Casbin权限管理”>“角色”,然后在“角色”页面上单击“添加”。
- 根据您的项目信息完成角色配置。在本文中,我们使用“nginx_role”作为示例角色名称。
- (可选)在顶部栏中,选择“用户管理”>“用户”,然后根据需要添加新用户。如果所需的用户已存在,则可以跳过此步骤。在本文中,我们将创建一个名为“user”的示例用户。
- 返回步骤 5 中提到的“角色”页面,编辑角色,并将您需要的用户添加到“包含的用户”选项中。在本文中,我们将添加之前在此处创建的。
nginx_rolebuiltin/user


Oauth2-proxy
使用提供程序(Google、GitHub 等)提供身份验证的反向代理和静态文件服务器 通过电子邮件、域或组验证帐户
1.Oauth2-proxy部署
注意:本文以 Oauth2-Proxy 项目为例。如果您想使用 Vouch 而不是 Oauth2-Proxy,请参考他们在 GitHub 上的官方文档。
注意:本文假定您的站点配置了受信任的 SSL 证书,并且仅允许 HTTPS 访问,或者您已设置从 HTTP 访问者到 HTTPS 的自动重定向。这有助于最大限度地保护 cookie,并防止恶意读取登录令牌。如果您的网站需要通过不安全的HTTP协议访问,请相应地修改相关命令。有关通过 HTTP 部署的更多帮助,请参考 GitHub 上 Oauth2-Proxy 的官方文档。
温馨提示:OAuth2-Proxy 提供了多种部署方式(如源码编译、Docker 安装等)。为了便于解释,本文使用“预构建的二进制文件”进行部署。
①下载Oauth2-proxy
### 1.转到 GitHub Releases 页面,下载与您的操作系统和 CPU 架构对应的二进制包。 截至 2024 年 1 月 1 日,OAuth-Proxy 的最新版本为 。如果要下载此版本的二进制软件包,可以对带有 AMD64 的 Linux 执行以下命令:V7.5.1
wget -O oauth2-proxy-linux.tar.gz https://github.com/oauth2-proxy/oauth2-proxy/releases/download/v7.5.1/oauth2-proxy-v7.5.1.linux-amd64.tar.gz

### 2.解压缩下载的包:
tar -zxvf oauth2-proxy-*.tar.gz

### 3.输入解压目录:
cd oauth2-proxy-v7.5.1.linux-amd64

### 4.将获取的二进制文件移动到并配置可执行权限。根据您的具体情况,您可能需要提升权限。/usr/local/binsudo
cp ./oauth2-proxy /usr/local/bin
cd /usr/local/bin
chmod +x ./oauth2-proxy

### 5.测试二进制安装。如果安装成功,在执行以下命令后,您应该会看到类似于 的输出。oauth2-proxy v7.5.1 (built with go1.21.1)
cd ~
oauth2-proxy --version
②运行oauth-proxy2
oauth2-proxy \
--provider=oidc \ #[required] Do not change
--client-id=abc123456def \ #[required] "Client ID" obtained in step I.4 above
--client-secret=abc123456def \ #[required] "Client Secret" obtained in step I.4 above
--oidc-issuer-url=https://auth.yourdomain.com \ #[required] Your Casdoor URL (domain name or public IP)
--redirect-url=https://project.yourdomain.com/oauth2/callback \ #[required] https://domain-of-the-project-to-protect/oauth2/callback
--scope=email+profile+groups+openid \ #[required] Obtained from Casdoor: user email, user profile, groups, and login authentication
--cookie-domain=project.yourdomain.com \ #[required] Domain name of the project you want to protect
--whitelist-domain=project.yourdomain.com \ #[required] Domain name of the project you want to protect
--cookie-secret=abc123456def \ #[required] Please generate a random string of numbers and letters and fill it in here
--email-domain=* \ #[required] List of acceptable user email domains (* means accept all domains). If the user's email suffix is not in this list, a 403 error will be returned even if the login is successful.
--insecure-oidc-allow-unverified-email=true \ #[required] Whether to accept users with unverified email addresses
--http-address=http://127.0.0.1:65534 \ #[required] Address that oauth2-proxy listens on. The port number here can be set arbitrarily. Please record the value you set, as it will be needed for configuring Nginx later.
--cookie-expire=24h0m0s \ #[optional] Cookie expiration time. After this period, users will need to log in again.
--custom-sign-in-logo=https://cdn.yourdomain.com/pic/proj.png \ #[optional] Icon displayed on the login page. It is recommended to use a rectangular image rather than a square one.
--session-store-type=redis \ #[optional] Use Redis cache. If you don't need Redis, you can delete this item.
--redis-connection-url=redis://127.0.0.1:6379/0 \ #[optional] Redis URL. If you don't need Redis, you can delete this item.
--redis-password=123456 #[optional] Redis connection password. If you don't need Redis or Redis has no password, you can delete this item.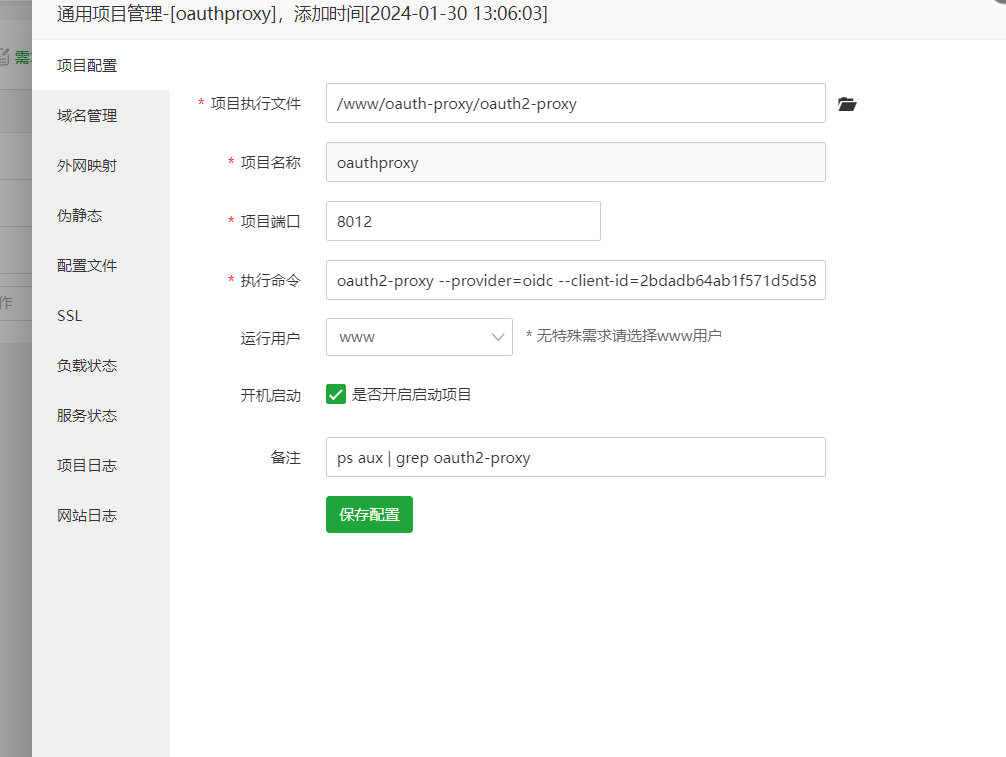
----skip-provider-button=true #[optional] 如果你是宝塔用户,可以使用“网站”的“其他项目”进行部署,可以将其纳入面板控制
Nginx
注意:从源代码编译安装时,请再次确认您的 Nginx 已启用该模块(编译命令包括 )。如果你不知道如何启用该模块,请参考 Nginx 模块文档。
如果nginx没有该模块,需要卸载后重新编译
ngx_http_auth_request_module--with_http_auth_request_modulengx_http_auth_request_module如果nginx没有该模块,需要卸载后重新编译
如果是宝塔用户可以直接使用以下方法安装模块,参考文章:宝塔 nginx 增加编译模块 – 赵俊个人博客 (zhaojun.vip),可以直接使用宝塔的文件管理系统操作
# 1.修改配置文件

vi /www/server/panel/install/nginx.sh

# 2.找到第 250-300 行之间 ./configure 开头如下字样的配置,我这里是在安装 ngx-fancyindex 模块,所以增加 --with-http_auth_request_module  :

./configure --user=www --group=www --prefix=${Setup_Path} ${ENABLE_LUA} --add-module=${Setup_Path}/src/ngx_cache_purge ${ENABLE_STICKY} --with-openssl=${Setup_Path}/src/openssl --with-pcre=pcre-${pcre_version} ${ENABLE_HTTP2} --with-http_stub_status_module --with-http_ssl_module --with-http_image_filter_module --with-http_gzip_static_module --with-http_gunzip_module --with-ipv6 --with-http_sub_module --with-http_flv_module --with-http_addition_module --with-http_realip_module --with-http_mp4_module --with-http_auth_request_module --add-module=${Setup_Path}/src/ngx_http_substitutions_filter_module-master --with-ld-opt="-Wl,-E" --with-cc-opt="-Wno-error" ${jemallocLD} ${ENABLE_WEBDAV} ${ENABLE_NGX_PAGESPEED} ${ADD_EXTENSION} ${i_make_args}
    make -j${cpuCore}
}

# 3.重新编译安装

sh /www/server/panel/install/nginx.sh install your_nginx_version

# 4.检查是否正确安装

nginx -V

正常输出将会包含  --with-http_auth_request_module
nginx配置
增加如下配置
location ^~ /oauth2/ {

        proxy_pass       http://127.0.0.1:8011; # Change this to the "--http-address" configured in step II.6

        proxy_set_header Host                    $host;
        proxy_set_header X-Real-IP               $remote_addr;
        proxy_set_header X-Scheme                $scheme;

        proxy_set_header X-Auth-Request-Redirect $request_uri;
        # or, if you are handling multiple domains:
        # proxy_set_header X-Auth-Request-Redirect $scheme://$host$request_uri;
    }
    location = /oauth2/auth {

        proxy_pass       http://127.0.0.1:8011; # Change this to the "--http-address" configured in step II.6

        proxy_set_header Host             $host;
        proxy_set_header X-Real-IP        $remote_addr;
        proxy_set_header X-Scheme         $scheme;
        proxy_set_header Content-Length   "";
        proxy_pass_request_body           off;
    }
    location ^~ /
{

    proxy_pass http://127.0.0.1:9003;# Change this to your app's url
    proxy_set_header Host $host;
    proxy_set_header X-Real-IP $remote_addr;
    proxy_set_header X-Forwarded-For $proxy_add_x_forwarded_for;
    proxy_set_header REMOTE-HOST $remote_addr;
    proxy_set_header Upgrade $http_upgrade;
    proxy_set_header Connection $connection_upgrade;
    proxy_http_version 1.1;
    # proxy_hide_header Upgrade;

    add_header X-Cache $upstream_cache_status;
    #Set Nginx Cache

    set $static_filefp9pXqS2 0;
    if ( $uri ~* "\.(gif|png|jpg|css|js|woff|woff2)$" )
    {
        set $static_filefp9pXqS2 1;
        expires 1m;
    }
    if ( $static_filefp9pXqS2 = 0 )
    {
        add_header Cache-Control no-cache;
    }
}
测试
- 接下来,您可以测试您的实现。
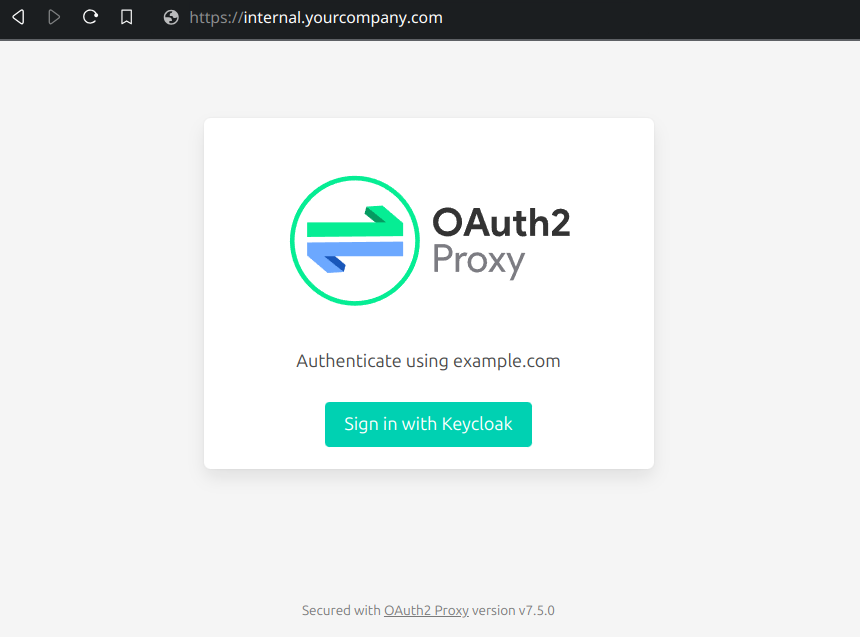
- 一般情况下,您的用户在登录您的服务时会经历以下过程:
- 在浏览器中打开 URL -> 仅看到需要登录的页面,包括名为“使用 OpenID Connect 登录”的按钮 -> 单击按钮并被重定向到您的 Casdoor 地址,他们将被要求登录 -> 用户输入他们的用户名和密码,Casdoor 验证他们的凭据 -> 自动重定向回您的 URL -> 成功访问您的服务 -> 用户在以下情况下将被要求再次登录您设置的时间将过期。
project.yourdomain.comproject.yourdomain.com--cookie-expire

2025-05-12-1024x1024.png)


挺有用的
还可以